

🧱 Chapter Four: Aquarium Stands & Filtration Systems – Smart Design Below the Surface
🔍 Adeep dive into stand construction, sump and hang-on-back filtration, and how to plan an intelligent equipment space
🔷 Chapter Introduction: Beneath the Aquarium… Where the Real System Lives
Most people entering the world of marine aquariums think the entire system revolves around what they see inside the glass: the corals, fish, lighting, and water flow. But in reality, the true heart of the system—the place where success or failure is determined—lies beneath the tank.
Behind a cabinet door, under the display, engineering, chemistry, and fluid dynamics quietly run a sensitive, complex ecosystem that controls everything visible above.
🎯 Why Should You Care About What’s Below the Tank?
Because it’s the biological and mechanical control center of your system.
This hidden area houses critical components:
- The protein skimmer
- Sump or filtration systems
- Return and circulation pumps
- Heating or cooling equipment
- Smart controllers and sensors
- ATO (Auto Top-Off) systems
Each of these devices can either save your reef… or trigger a total system failure.
🧠 Under the Tank = A Fully Integrated Micro-Lab
Think of it as a “command center”, not just empty space.
Instead of wires and screens, you’ve got:
- Bio-filtration engineering
Directing flow, gas exchange, and waste removal - Elemental chemistry
Precisely balancing calcium, alkalinity, and magnesium - Electrical safety
Managing high-voltage gear beside saltwater in tight quarters - Smart monitoring & AI
Modern systems that analyze, alert, and even adjust automatically
💡 The Overlooked Truth Nobody Tells You
Many reefers start out with simple tanks and get great results…
But none reach true long-term success until they master the system beneath the display.
You can decorate the top easily—corals, lights, aquascaping.
But real performance starts with what’s underneath.
And it’s not just about buying “good equipment.” It’s about building a space that’s organized, safe, logical, and sustainable.
📉 Why Do So Many Tanks Fail Due to Poor Below-Tank Design?
- Underrated stands collapse under pressure
- Cable messes lead to shorts, fires, or electrocution
- Small leaks silently destroy floors and electronics
- Poor sump design limits equipment performance
🧩 This Chapter Isn’t About Products — It’s About Philosophy of Design
We won’t just compare hang-on filters and sumps.
We’ll ask and answer:
- How do you choose the right stand material for your tank’s weight and location?
- How can a 60 cm space process saltwater like a professional filtration lab?
- How do you balance flow rate without causing noise or backflow?
- What electrical and safety precautions are essential under saltwater?
- What do real-world advanced reefers do in premium setups?
- Can you run a reef without a sump? When is that actually smart?
By the end of this chapter, you’ll never look at “the cabinet under your tank” the same way again.
You’ll see it as the foundation of an ecosystem—delicate, dynamic, and alive.
🪵 First: The Aquarium Stand – The Structure That Supports an Ocean
One of the first decisions you’ll face when setting up a marine aquarium is:
Where will I place the tank? And what kind of stand will safely support its weight?
It may sound like a simple question, but it actually involves architectural and engineering decisions that affect the long-term stability, safety, and serviceability of your reef for years to come.
📏 Structural vs. Engineering Function
Every aquarium stand must fulfill two essential roles:
- Structural Function: It must bear the massive weight of the entire setup—including water (1 liter = 1 kg), live rock, substrate, equipment, and the tank glass itself.
A 250-liter tank can easily exceed 350–400 kg in total load.
- Engineering Function: It must provide a well-designed, organized space for everything beneath the tank—sump, cables, plumbing, equipment—while remaining accessible and clutter-free.
🪵 Types of Stand Materials: Pros and Cons
| Material | Advantages | Disadvantages | Notes |
|---|---|---|---|
| Natural Wood (Oak, Beech) | Strong, customizable, aesthetically warm | Susceptible to moisture, warping, decay | Requires waterproof coating |
| Engineered Wood (MDF, Plywood) | Affordable, easy to cut & build | Fragile under humidity and salt exposure | Use only if fully sealed |
| Galvanized Steel / Stainless | Extremely durable, corrosion-resistant | Heavy, sharp edges, needs floor protection | Ideal for large or commercial tanks |
| Aluminum Extrusion Frames | Lightweight, modular, corrosion-proof | Expensive | Perfect for mobile or advanced builds |
| Reinforced PVC (UPVC, HD PVC) | Fully water-resistant, lightweight | Lower load capacity | Best for tanks up to ~150 liters |
🧠 Must-Know Engineering Criteria When Building or Choosing a Stand
- Accurate Load Calculation:
Don’t just eyeball it.
Your stand must support the full tank system plus sump, gear, and a 20% safety margin. - Support Directly Beneath Glass Panels:
Especially with rimless tanks, avoid pressure points on unsupported glass. - Moisture and Salt Resistance:
Use epoxy coatings or waterproof laminates to shield surfaces from corrosion and mold. - Ventilation Design:
Rear or side openings prevent moisture buildup and cable degradation over time. - Maintenance-Proof Flooring:
Consider drip trays or waterproof bottom liners to catch small leaks before they cause major damage.
🎨 Aesthetic Integration With the Living Space
While the stand is a functional necessity, it’s also part of your aquarium’s visual appeal. A well-designed stand can make your setup feel like a unified design element within your home.
- Use high-gloss panels or painted wood to match walls
- Add motion-sensor cabinet lights for ease of access
- Choose fingerprint- and scratch-resistant surfaces
- Coordinate the stand’s design with overhead lighting or canopy features
🧩 Often-Overlooked Design Details
- Adjustable leveling feet to stabilize the tank on uneven floors
- Electrical zones isolated from plumbing compartments
- Removable cabinet doors for easy sump maintenance
- Extra holes or ports for future plumbing or upgrades
- Sound-absorbing mats to reduce pump vibrations
The aquarium stand isn’t just a support structure—it’s the foundation of every maintenance routine, every upgrade, and every safety measure you’ll rely on.
Treat it as the platform holding your miniature ocean—and build it with care.
💧 Second: Filtration Systems – The Beating Heart Below the Display
While the glass aquarium above showcases the beauty, the real life support happens in the filtration system.
It’s the subconscious brain of your reef—controlling water quality, chemical balance, waste removal, and the environment for beneficial bacteria and microfauna.
If reef tanks are like coral forests, then the filtration system is the hidden root network that sustains everything above.
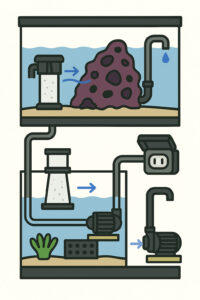
🔁 What Is a Sump?
A sump is a secondary water reservoir placed beneath the main display tank, usually hidden inside the cabinet.
Water flows down from the tank by gravity through a drain line, and is pumped back up by a return pump.
The sump’s core purposes include:
- Housing filtration equipment away from the display
- Increasing total water volume, improving stability
- Simplifying maintenance without disturbing livestock
- Allowing separate chambers for different functions
🔧 Internal vs. External Sumps
| Type | Pros | Cons |
|---|---|---|
| Internal Sump | Built inside the display (glass section) | Takes up display space, limited upgradeability |
| External Sump | Placed under the tank in the stand | Requires careful plumbing; risk of overflow |
External sumps are ideal for mid-to-advanced setups. Internal sumps are better suited for nano tanks or beginners.
🆚 Sump vs. Hang-on-Back (HOB) Filtration
A Hang-on-Back filter (HOB) is a waterfall-style filter that hangs on the rear edge of the tank.
| Feature | Sump | Hang-on-Back (HOB) |
|---|---|---|
| Size | Large, customizable | Small, limited space |
| Future Expandability | Very flexible | Minimal to none |
| Supported Equipment | All types: skimmer, refugium, media | Basic sponge or carbon |
| Maintenance | Easy but requires cabinet access | Simple and fast |
| Power Outage Safety | Needs overflow protection | Safer by default |
| Noise | Can be loud if poorly designed | Quieter |
| Professional Capability | Top-tier | Entry-level or temporary solution |
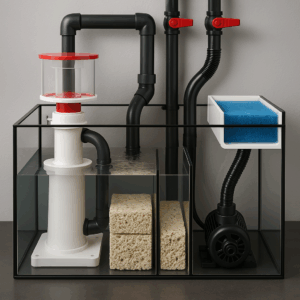
🧬 Chamber Layout in a Sump: Organized Multi-Function Logic
Most sumps are divided into 3–4 main chambers, each with a dedicated purpose: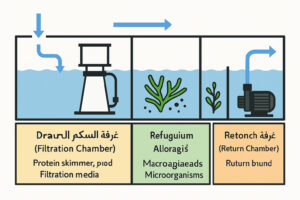
- Drain Chamber
Where water first enters from the tank. Initial bubble and debris separation happens here. - Filtration Chamber
Hosts the protein skimmer and filtration media (carbon, phosphate removers, etc.). - Refugium
A chamber for macroalgae (like chaetomorpha) and microfauna, helping absorb excess nutrients. - Return Chamber
Where the return pump sends water back to the display.
🌊 Hydrodynamics Inside the Sump
One of the most overlooked aspects of sump design is:
- Flow Pathing: Water should move smoothly with no dead zones
- Baffle Count & Height: Impacts flow control and bubble elimination
- Stable Water Levels in key zones like the skimmer chamber, which affects equipment performance
A sump isn’t just a glass box—it’s a fluid engineering system where every detail matters.
⚙️ Third: Designing the Ideal Sump
You might own the best protein skimmer, the most powerful return pump, and the latest filtration media…
but without a smart sump design, you’ll never unlock the full efficiency of your system.
A sump isn’t just a box with chambers.
It’s a system rooted in fluid dynamics, equipment behavior, and long-term ease of maintenance.
It’s one of the secrets that separate a tank that “works” from a system that works flawlessly for years.
💡 Calculating the Flow Rate
The first step in any sump design is knowing how much water needs to pass through it per hour.
The general rule:
🔁 Sump Flow Rate = 4 to 10 times the display tank volume per hour
| Display Volume | Minimum (×4) | Maximum (×10) |
|---|---|---|
| 100 liters | 400 L/h | 1000 L/h |
| 200 liters | 800 L/h | 2000 L/h |
| 500 liters | 2000 L/h | 5000 L/h |
More fish and nutrient input? Aim for the high end.
Want silence and energy savings? Stay near the low end.
🛠️ Important note when choosing your pump:
The flow rate listed on a pump’s label (e.g., 2000 L/h) is its maximum output at 0 meters of head height.
But in practice, as the vertical distance (head height) between the sump and the display increases,
the pump’s actual flow drops significantly.
So always refer to the manufacturer’s performance curve, which shows how much flow the pump delivers at various heights.
Making the right choice ensures efficient, reliable flow—without overworking the pump or compromising the system.
📐 Choosing the Right Sump Size
There’s no single “correct” size, but a solid rule of thumb is:
Sump Volume = 25% to 40% of your main tank volume
Examples:
- 300L tank → 75–120L sump
- 500L tank → at least 125L sump
Why it matters:
- Larger sump = greater biological stability
- More space = more equipment flexibility
- Deeper sump = less water-level fluctuation
🔇 Noise Reduction: The Quiet Flow Design
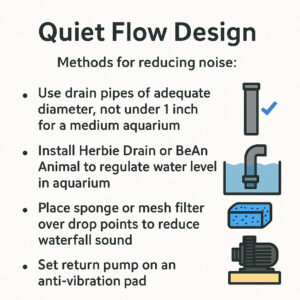
One of the most frustrating flaws in sump design is excessive noise from drains and pumps.
Tips to reduce noise:
- Use proper drain pipe diameter—not smaller than 1 inch for mid-sized tanks
- Install Herbie or Bean Animal overflow systems to maintain stable water height in the display
- Add sponge filters or mesh pads to quiet splashes
- Mount the return pump on rubber pads to absorb vibrations
☔ Flood Protection and Reverse Siphon Control
A critical question: What happens if the power goes out?
Your sump must be designed to avoid disaster in the following cases:
- When the return pump stops: the tank shouldn’t overflow through the plumbing
- When power returns: you shouldn’t get a reverse siphon that floods your stand
Solutions:
- Check valves to prevent backflow
- Drain pipes positioned at the right height to break siphon
- Estimate the fallback water volume when power cuts out, and ensure your sump has enough room to absorb it
🛠️ Daily Maintenance Considerations
Even the smartest sump design becomes a headache if it’s hard to clean or access.
Golden tips:
- Make sure your hand can reach every chamber easily
- Include space for quick-testing equipment (e.g., test taps)
- Keep a dry compartment in the stand for tools and supplies
- Install internal LED lighting to see clearly during work
- Store a small backup return pump inside the cabinet, ready for emergencies
The smarter your sump design… the fewer issues you’ll face down the line.
A great sump = a stable, quiet, expandable, low-maintenance marine system.
🔌 Fourth: The Smart Workspace – Real-Life Layout Beneath the Tank
It might seem simple: just a cabinet under the tank.
But the truth is, what’s beneath the tank is your marine system’s command center.
Every wire, every pump, every switch, every test—it all happens down there.
And if the layout isn’t smart from day one, you’ll face clutter, mistakes, and exhausting maintenance over time.
In this section, we’ll explore how to create an organized, safe, and efficient space that makes working on your tank a pleasure—not a chore.
🧭 Cable Routing and Electrical Safety
Electricity in a humid, salty environment? A constant hazard that must not be ignored.
Key tips for safe electrical setup:
- Never run power cables directly above or behind plumbing lines
- Use cable trays or ducts to create tidy, secure cable paths
- Rely on moisture-resistant sockets (rated IP65 or higher)
- Divide circuits based on purpose:
- Pumps
- Lighting
- Cooling/heating devices
- Emergency-only equipment
💡 Tip: Use individual toggle switches for each device so you can turn them off separately without cutting power to the entire system.
💨 Lighting and Ventilation Inside the Cabinet
Humidity inside a tank cabinet can reach 90%, especially in hot climates or when using fans for cooling.
Smart solutions:
- Install a small ventilation fan (5–12V) on a timer or humidity sensor
- Cut ventilation holes on the cabinet’s side or back panels
- Add a cool white LED strip for easy visibility at night or during emergencies
📌 Important: Keep cabinet lighting completely separate from your tank’s main lights, and operate it manually when needed.
🗄️ Equipment Shelves and Control Boards
Instead of stacking devices randomly on the floor… organization is key.
Steps for a clean, functional control zone:
- Mount a control board made of wood or plastic to the cabinet wall
- Secure devices such as:
- Temperature/chiller controllers
- Dosing units
- Salinity and temperature monitors
- Timers
- Use non-corrosive metal or plastic shelving for loose gear
- Leave proper spacing between devices to allow airflow
🧯 Safety Standards: Water, Salt, and Electricity
Safety first:
- Elevate all plugs and devices at least 10 cm off the floor
- Use RCD/GFCI breakers to protect against electrical leakage
- Avoid cheap extension strips
- Keep a fire blanket and small extinguisher nearby in case of a short circuit
🚫 Warning: Salt evaporates and condenses over time, causing corrosion. Regularly wipe around devices with a damp cloth only.
🛟 Emergency Tools & “Quick-Access Zone”
Always allocate a section of the cabinet for essential tools:
- Water siphon hose
- Fish net
- Spare distilled water bottle
- Backup return pump
- Manual thermometer
- Portable light source
- Quick test kits (ammonia – nitrite – nitrate)
✳️ Place this kit near the front of the cabinet, so it’s easy to reach in the dark or during a malfunction.
A smart workspace doesn’t need to be expensive or luxurious…
but it must be organized, safe, and easy to work with.Every minute saved on daily maintenance = more time enjoying your reef.
🧠 Fifth: What Do the Pros Do? Real-World Design Examples from the Global Reefing Community
All the rules and best practices we’ve discussed…
remain theoretical until you see how they’re applied in real life. This is where science meets experience.
Professional reefers don’t blindly follow one template.
They tailor their systems to match their goals, budget, and the needs of their livestock.
In this section, we’ll explore actual setups from around the world—some simple and clever, others surprisingly advanced.
🧪 Case Study: Advanced Hang-On Filtration
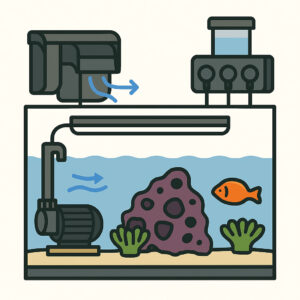
In small tanks or tight spaces, there’s often no room for a full sump.
But that doesn’t mean the system has to be weak.
Featured setup:
- 90-liter tank
- Dual HOB filters (one mechanical, one biological)
- Triple-head dosing unit mounted on a side shelf
- Compact heater hidden behind the aquascape
- Small ATO reservoir mounted above the tank
🔍 Result: A fully stable system running for over 3 years, housing fish and LPS corals with no major issues.
💡 Takeaway: Smart distribution beats raw size.
🧪 Case Study: Dual Sump with Professional Isolation System
In a large 1000-liter reef, one reefer implemented a creative dual-sump layout:
- Primary sump under the tank
- Secondary sump in a separate, ventilated utility room
- First sump handles quick filtration, heating, and skimmer
- Second sump houses a large refugium, advanced biomedia, and temporary isolation chambers
🔁 Two transfer pumps circulate water between the sumps, with anti-flood safeguards in place.
💡 Result: Massive processing power, high flexibility, and stress-free maintenance.
🧪 Case Study: High-Efficiency Reef-Ready System
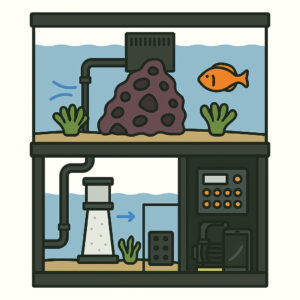
Reef-Ready tanks come pre-fitted with integrated overflow and return plumbing from the manufacturer.
One standout setup:
- 250-liter tank with a rear overflow box
- Herbie-style dual drain (silent operation)
- Four-chamber sump
- Stand fitted with a full-featured power center (Neptune or GHL)
- Includes ATO, refugium, and full smartphone control
📱 The entire system is cloud-connected and remotely accessible.
💡 Result: Mental peace and full control over a complex reef.
🧪 Case Study: A Sump-Free Tank – When and Why?
Some reefers go sump-free by design. When is this acceptable?
- In nano tanks under 50 liters
- Or when ultra-simplification is the goal
One such example:
- 40-liter tank
- Internal all-in-one filtration compartment
- Basic lighting
- Manual top-off
- Weekly 15% water changes
💡 Result: Soft corals and small fish remained healthy for two years with minimal intervention.
This doesn’t mean sump-free is ideal… but it’s viable in specific use cases.
In the end, there is no “perfect” design.
There is a design that fits you, supports your reef’s stability, and makes maintenance easy and enjoyable.